SFM compile refers to two distinct processes in Source Filmmaker: converting raw 3D assets (like models, textures, and maps) into Source Engine formats (.mdl and .bsp), or rendering a finished scene out of SFM as a final movie or image sequence.
Whether you are bringing custom 3D models into your scene, building a custom environment, or exporting your final video, knowing how the compilation pipeline works helps you avoid broken textures, missing assets, and render crashes.
This guide breaks down every step of the asset pipeline and export setup so you can compile custom content cleanly and export high-quality renders.
What Does “SFM Compile” Mean? (Two Different Workflows)
In Source Filmmaker, the word “compile” is used for two completely different workflows. Mixing up these workflows is the main reason beginners get confused.
                    ┌─────────────────────────────────────────┐
                    │               SFM COMPILE               │
                    └────────────────────┬────────────────────┘
                                         │
                    ┌────────────────────┴────────────────────┐
                    │                                         │
        ┌───────────▼───────────┐                 ┌───────────▼───────────┐
        │   ASSET COMPILATION   │                 │      MOVIE EXPORT     │
        │   (Pre-Production)    │                 │    (Post-Production)  │
        └───────────┬───────────┘                 └───────────┬───────────┘
                    │                                         │
        • Models: SMD/DMX ➔ MDL                   • Scene ➔ AVI / MP4
        • Textures: PNG ➔ VTF/VMT                 • Scene ➔ PNG Sequence
        • Maps: VMF ➔ BSP                         • Tools: SFM Layoff Engine
        • Tools: Crowbar, Hammer
Asset Compilation: Models, Textures, Animations, and Maps
Asset compilation happens before you open your scene in SFM. Source Filmmaker requires specific compiled formats rather than raw 3D files.
Asset compilation turns those raw files into compiled formats:
- Models:
.smdor.dmxfiles turn into.mdlfiles via StudioMDL or Crowbar. - Textures:
.pngor.tgafiles turn into.vtfimage files and.vmtmaterial scripts using a VTF tool (for example VTFEdit). - Maps:
.vmflayout files turn into lighting-baked.bspmap files. Hammer runs VBSP/VVIS/VRAD to build the.bsp.
Movie Export (Layoff): Rendering Your Final Animation
Movie export happens after your animation, scene lighting, and camera work are finished inside SFM.
You go to File > Export > Movie, where SFM processes every frame of your scene into a video file (such as AVI) or an image sequence (such as PNG or TGA).
| Workflow Aspect | Asset Compilation (Pre-Production) | Movie Export (Post-Production) |
| Primary Goal | Convert external files so SFM can read them. | Save your finished animation as a video or image sequence. |
| Input Files | .smd, .dmx, .vmf, .png, .qc | .dmx (SFM session file), active camera, lighting |
| Output Files | .mdl, .vtf, .vmt, .bsp | .avi, .mp4, or .png/.tga frame sequence |
| Core Tools | Crowbar, StudioMDL, VTFEdit, Hammer Editor | Source Filmmaker Export Menu |
How to Compile a Custom Model for SFM (Step-by-Step)
Compiling a custom 3D model is the most common use of the sfm compile workflow. Follow these 7 steps to turn a raw 3D mesh into a functional model inside SFM.
┌─────────────────────────────────────────────────────────────────────────┐
│                     7-STEP MODEL COMPILE PIPELINE                       │
├─────────────────────────────────────────────────────────────────────────┤
│ 1. Export Mesh  ──► 2. Convert Textures ──► 3. Write QC Script          │
│    (.smd / .dmx)       (.vtf & .vmt)       ($modelname, $sequence)  │
│                                                                         │
│ 4. Crowbar      ──► 5. Test in HLMV    ──► 6. Folder Setup   ──► 7. SFM   │
│    (Compile .mdl)      (Verify mesh)       (usermod paths)    (Load)    │
└─────────────────────────────────────────────────────────────────────────┘
1. Prepare and Export Your Mesh (SMD or DMX)
Model your asset in Blender, Maya, or 3ds Max. Ensure your mesh is unwrapped, assigned to a material, and rigged to a bone skeleton.
Use an addon like Blender Source Tools (blender-source-tools) to export your model.
.smd(Studiomdl Data): The classic, reliable format for meshes and skeletal animations..dmx(Datamodel Exchange): The format supported by Valve. It handles flex data (facial expressions) and complex bone setups.
Export your reference mesh (the geometry) and any animation sequences into a working folder on your computer.
2. Convert Textures to VTF and Create VMT Files
Source Engine models do not read .png or .jpg image files directly. You need two files for every texture layer:
.vtf(Valve Texture Format): The actual image data. Open your.pngor.tgain a community tool like VTFEdit and save it as a.vtffile..vmt(Valve Material Type): A small text script that tells the engine how the texture should behave (shininess, transparency, or bump maps).
Here is a basic .vmt template for a standard material:
Code snippet
"VertexLitGeneric"
{
	"$basetexture" "models/my_custom_model/my_texture"
	"$surfaceprop" "metal"
	"$halflambert" "1"
}
Crucial Path Rule: The
$basetexturepath is relative to thematerials/directory, so do not includematerials/at the beginning of the path string.
3. Write a QC Script (With Minimal Template)
A .qc file is a text script that instructs studiomdl.exe how to build your model. Crowbar calls studiomdl.exe using your .qc. It specifies where mesh files are, where textures live, and how bones move.
Create a new text file, paste this minimal script, and save it as my_model.qc:
Code snippet
// Defines the compiled model name and folder path inside usermod/models/
$modelname "my_custom_model/my_model.mdl"

// Sets the directory where your source .smd or .dmx files live on your PC
$cd "."

// Sets the path inside usermod/materials/ where SFM should search for .vmt files
$cdmaterials "models/my_custom_model/"

// References your main 3D geometry file
$body "body" "my_mesh.smd"

// Sets physical surface properties (e.g., metal, flesh, wood)
$surfaceprop "flesh"

// Defines a default static pose animation (required for successful compile)
$sequence "idle" "my_mesh.smd" fps 30 loop
4. Compile with Crowbar (or StudioMDL)
While you can use studiomdl.exe via the Windows command line, Crowbar is a widely used community tool for compiling Source Engine assets.
Open Crowbar and switch to the Compile tab to set up your QC file and target game settings, then click Compile. Watch the log window for completion messages confirming your .mdl file was successfully built.
5. Test in Half-Life Model Viewer (HLMV) Before SFM
Never load a newly compiled model straight into a complex SFM scene. Check it in Half-Life Model Viewer (HLMV) first to preview models and verify bone structures.
Open your compiled .mdl file, verify that your model displays its textures correctly (not purple and black), and check the Bones tab to make sure your rig is intact.
6. Move Files into the Correct SFM Folders
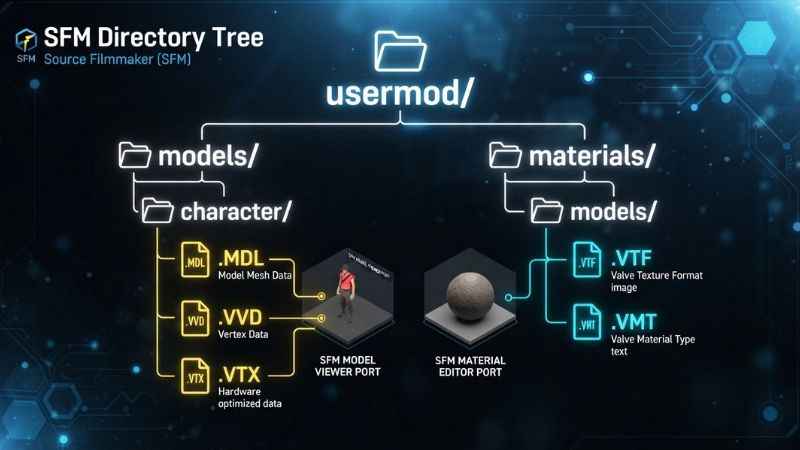
SFM looks for files in its game directories. A common location for custom content is the usermod folder, depending on your mod setup:
steamapps/common/SourceFilmmaker/game/usermod/
├── models/
│   └── my_custom_model/
│       ├── my_model.mdl
│       ├── my_model.vvd
│       └── my_model.dx90.vtx
└── materials/
    └── models/
        └── my_custom_model/
            ├── my_texture.vtf
            └── my_texture.vmt
If your files are placed outside these specific paths, SFM will fail to render the model or its textures.
7. Load the Model in Source Filmmaker
- Launch Source Filmmaker.
- In the Animation Set Editor, right-click the panel and select Create Animation Set for New Model.
- Type your model name (
my_model.mdl) into the search bar. - Select the model and click Open. Your character or prop will spawn in your viewport.
How to Compile a Custom Map for SFM (VMF $\rightarrow$ BSP)
Map compilation turns raw level geometry (.vmf) into a fully lit, optimized Source Engine map file (.bsp).
1. Build Your Map in Hammer Editor and Save VMF
Launch the Hammer Editor version included with Source Filmmaker. Construct your level geometry, apply materials, add light entities, and save your map file as a .vmf inside usermod/mapsrc/.
2. Run VBSP, VVIS, and VRAD
Map compilation runs three sequential processing passes:
┌─────────────┐     ┌─────────────┐     ┌─────────────┐     ┌─────────────┐
│  .VMF File  │ ──► │    VBSP     │ ──► │    VVIS     │ ──► │    VRAD     │ ──► .BSP Map
└─────────────┘     │(Geometry/BSP)     │(Visibility) │     │ (Lighting)  │
                    └─────────────┘     └─────────────┘     └─────────────┘
| Tool | Main Function | Performance Impact |
| VBSP | Converts raw geometry brushes into solid 3D structures and checks for leaks. | Fast (Seconds to minutes). |
| VVIS | Calculates visibility lines so hidden areas are not drawn on screen. | Moderate to Slow (Depends on brush complexity). |
| VRAD | Bakes static light maps, shadows, and bounce lighting into the scene. | High CPU usage (Minutes to hours for final builds). |
When testing a map layout, select lower settings for VVIS and VRAD in Hammer’s compile window, then switch to higher settings for final builds.
3. Fix Common Map Compile Errors
- Leaks: A leak happens when the map is not sealed and connects to the void. If VBSP detects a leak, VRAD may fail or be skipped, leaving the map dark. Go to Map > Load Pointfile in Hammer to follow the red line straight to the opening in your map, then close the gap.
- Long VRAD Times: Too many dynamic light entities or unoptimized complex brushes increase bake times. Turn decorative geometry into
func_detailentities so VVIS skips calculating visibility lines for minor details.
4. Load and Test the Map in SFM
Save the compiled .bsp file to usermod/maps/, depending on your mod setup. Inside SFM, load your custom environment into the primary viewport.
SFM Compile Tools You Need (And How to Set Them Up)
Setting up your environment correctly prevents most compile crashes.
                          ┌──────────────────────────┐
                          │    MINIMUM TOOL STACK    │
                          └────────────┬─────────────┘
                                       │
          ┌────────────────────────────┼────────────────────────────┐
          │                            │                            │
┌─────────▼─────────┐        ┌─────────▼─────────┐        ┌─────────▼─────────┐
│   MODELING TOOL   │        │    COMPILER UI    │        │   TEXTURE TOOLS   │
│  Blender + BST    │        │      Crowbar      │        │  VTFEdit / HLMV   │
└───────────────────┘        └───────────────────┘        └───────────────────┘
- Crowbar (Setup and Compiler UI): Crowbar coordinates model compilation and decompilation. In the Setups tab, configure your profile for Source Filmmaker by setting the appropriate game executable and
studiomdl.exepaths for your installation. - StudioMDL (Command-Line Basics):
studiomdl.exeis Valve’s official command-line compilation utility. Crowbar runs this tool under the hood. It can also be run manually via Command Prompt by passing your target paths and QC script. - Hammer Editor and Source SDK Tools: Hammer Editor handles map creation and BSP building. Launch Hammer directly from your SFM installation tools.
- Texture Tools (VTF/VMT) and HLMV:
- VTF Tools: Converts standard
.png/.tgaimages into Source Engine.vtftextures using community tools like VTFEdit. - Half-Life Model Viewer (
hlmv.exe): A standalone viewer used to preview models, check material bindings, and verify bones without booting up the entire SFM application.
- VTF Tools: Converts standard
Common SFM Compile Errors and How to Fix Them
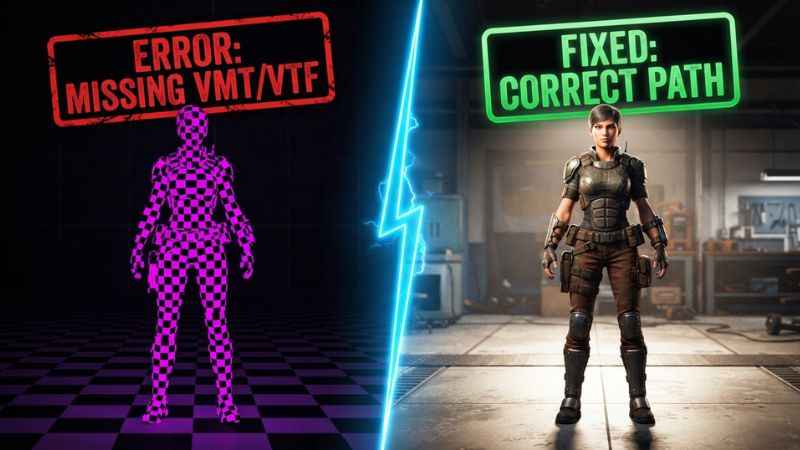
Use this matrix to diagnose issues when models or maps fail during compilation.
| Symptom | Likely Cause | Fix Steps |
| Purple and black checkerboard texture | Missing .vtf/.vmt files or wrong $cdmaterials path. | 1. Open .vmt and check $basetexture path.2. Confirm .vtf file exists at that path.3. Check $cdmaterials in .qc. |
| Model compiles but does not show in SFM | Files saved outside usermod or missing $sequence. | 1. Check that .mdl is inside usermod/models/.2. Confirm the .qc file contains a valid $sequence. |
| StudioMDL/Crowbar compile error log | Syntax error in .qc or missing .smd reference. | 1. Open compile log and find the line number. 2. Fix typos or missing quotes in .qc file. |
| Model is stretched or in a T-pose | Bone mismatch or improper export settings in 3D software. | 1. Match bone names across reference and animation files. 2. Re-export .smd with origin scales set to 1.0. |
| Map compile fails / dark lighting | Map leak or geometry void opening. | 1. Open Hammer and select Map > Load Pointfile. 2. Seal any openings to the outer void, then recompile. |
Exporting and Rendering: “Compiling” Your Final SFM Animation
Once your animation is complete, the final step is rendering (or “laying off”) your video out of SFM.
Render Settings for Quality
Before exporting, adjust your progressive refinement settings in SFM. Right-click the viewport, select Render Settings, and configure:
- Motion Blur: Enable and select higher sample rates for smooth action motion.
- Depth of Field: Enable and select higher sample rates to smooth out focal blurs.
- Ambient Occlusion (AO): Set to Outline Only or AO Included to soften corner shadows without adding image noise.
Export Movie vs. Image Sequence (PNG/TGA) + Audio
While SFM offers a direct MP4/AVI export, exporting as an image sequence is preferred by many users for quality and stability.
RECOMMENDED RENDERING WORKFLOW
┌────────────────┐     ┌────────────────┐     ┌────────────────┐
│  SFM ANIMATION │ ──► │ IMAGE SEQUENCE │ ──► │  VIDEO EDITOR  │ ──► Final Video
│  (Scene File)  │     │  (PNG Frames)  │     │(Premiere/DaVinci)   (.MP4)
└────────────────┘     └────────────────┘     └────────────────┘
- Image Sequence (PNG/TGA): SFM renders each frame as an individual image alongside a separate
.wavaudio track. If SFM crashes on frame 800 of a 1,000-frame render, you keep the first 799 frames and can resume from frame 800 without losing progress. - Direct Video Export (MP4/AVI): Renders a single video file. If the export crashes mid-render, the entire file becomes corrupted.
Resolution and Frame Rate
SFM allows you to set custom resolutions for viewport exports and rendering. Configure your render settings or launch options to export your image sequence at higher resolutions like 1080p, 1440p, or 4K.
Best Practices and Workflow Tips for Reliable SFM Compiles
- Test in HLMV first: Checking your
.mdlin HLMV takes five seconds and catches missing textures or broken rigs before loading SFM. - Keep a clean
usermodlayout: Organize models and materials inside dedicated subfolders (e.g.,usermod/models/project_name/) to avoid file collisions. - Version your
.qcscripts: Save incremental scripts (model_v1.qc,model_v2.qc) so you can roll back whenever a compile fails. - Always use Image Sequences: Render complex scenes out as PNG frame sequences to safeguard against crashes and preserve visual quality.
FAQ: SFM Compile Questions Answered
What does “sfm compile” mean in Source Filmmaker?
It refers either to converting raw 3D assets (models, textures, or maps) into formats readable by the Source Engine (.mdl, .vtf, .bsp) or exporting a finished animation scene into a final video file or image sequence.
Why are my SFM textures purple and black?
This missing texture pattern occurs when the engine cannot find your .vmt or .vtf material files. It is usually caused by an incorrect $cdmaterials path in your .qc script or a typo in your .vmt file’s $basetexture line.
How do I set up Crowbar for SFM compile?
Download Crowbar, navigate to the Setups tab, and add Source Filmmaker. Configure your game executable directory and studiomdl.exe path to match your installation paths.
Where do compiled model files go so SFM can find them?
A common location for compiled .mdl files is the SourceFilmmaker/game/usermod/models/ folder. Their matching .vmt and .vtf material files belong inside SourceFilmmaker/game/usermod/materials/.
What are the best export settings for high-quality SFM renders?
For higher render quality, enable Motion Blur, Depth of Field, and Ambient Occlusion in the Render Settings menu, and export the scene as a PNG image sequence rather than a direct video file.
Why doesn’t my compiled model show in the Animation Set Editor?
This usually happens if the model files were placed outside the usermod/models/ directory or if the .qc script was missing a valid $sequence command during compilation. Always reload SFM or reload the model list after compiling new files.
Should I export as video or image sequence from SFM?
Many users prefer exporting as an image sequence (PNG or TGA) for quality and stability. Image sequences prevent file corruption if SFM crashes mid-render and preserve full color quality.
You May Also Like:
Gaseping.com Explained: What It Is, Whether It’s Safe, and Who Should Use It
TechNewsOutlets.com USA: What It Is, How It Works, and How to Use It

Joseph Quinn is the founder and editor of Punspa, a technology-focused website covering technology, website reviews, internet terms, and other things worth figuring out online. He writes and edits the site’s technology and web content, with a focus on clear, useful explanations. He also enjoys humor and wordplay, which occasionally leads him to write a pun-related article just for the fun of it.